
17 de abril de 2013
15 de abril de 2013
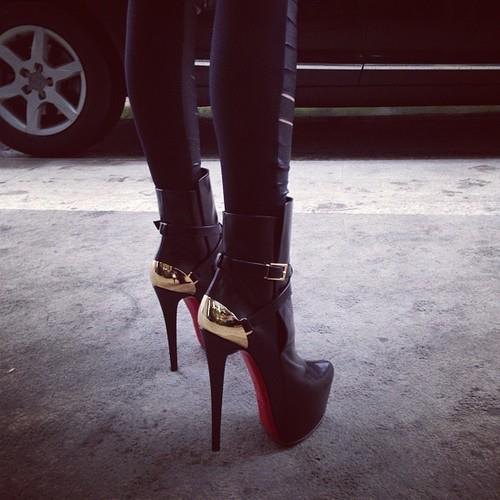
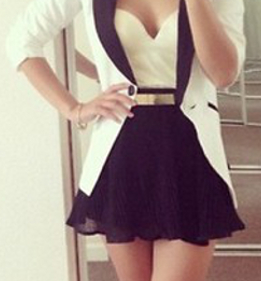
Sneaker Wedges - a MUST love ♥

I have been these around for a while and Oh, are they amazing!!
They go with everything and anything and give a sort of bohemian chic feel to any outfit you rock these babies with.
Sneaker wedges are my current Fashion Obsession and the one buy I should have made in NYC, and didn't.
*
Estos han estado alrededor por un rato y Oh, son fantasticos!!
Van absolutamente con cualquier outfit y le dan como un aire bohemio chic a el atuendo con el que uses estos bebes.
Tennis con plataforma son mi obsesion de moda del momento y la compra que me arrepiento de no haber hecho en NYC.
x, Stay Chic
13 de abril de 2013
New York City ♥


I
had never been to NYC before and this month I did, even if only for a
few days. It's one of the places I have always wanted to visit and I am
so glad I finally did. I had an amazing time going through Times Square
and all its surroundings and exploring the city day and night. I fell IN LOVE
with the fashion! to the point where I was paying more attention to
that than to the colorful ads and tall buildings (they're just colorful
ads and buildings). It was amazing! I loved the stores as well, and
spent much of my time dragging my loving boyfriend around from store to
store both in Manhattan and SoHO. We also took a little trip to Jersey. I
loved the experience, and felt like such a big girl traveling alone for
the first time. My favorite place to go to was definitively Central
Park, and even though the trees were mostly dead I could only imagine
how gorgeous it'd be in the summer. Nevertheless, the most amazing part
of it all was -obviously- seeing my boyfriend again :) ♥
*
Nunca habia estado en NYC y este mes fui, aun si solo por algunos dias. Es uno de los lugares que siempre he deseado visitar y estoy super Feliz por que por fin lo hice. La pase de maravilla explorando Times Square y todos sus alrededores y explorando la vida diurna y nocturna de la ciudad. Me ENAMOREEEE de la moda!! Me enamore tanto que pasaba mas tiempo fijandome en la moda que en los edificios y en los coloridos anuncios por los que Times Square es famoso. Fue maravilloso! Tambien ame las tiendas y pase la mayoria de mi tiempo arrastrando a mi novio de tienda a tienda tanto en Manhattan como en Jersey y SoHo. Tambien hicimos un pequeño viaje a Jersey. Ame la experiencia :D ♥ Me senti como una niña grande viajando solita por mi primera vez. Mi lugar favorito fue sin lugar a dudas Central Park. Los arboles estaban casi todos muertos, pero me imagine lo bello que se veria todo en el verano. No obstante, la mejor parte del viaje fue -obviamente- ver a mi novio de nuevo :D ♥
MAC Mini Haul ♥♥

Hello pretty ladies! I got some MAC products on the last couple of weeks and I wanted to share my mini Mac Haul with you gals!
The first thing I got (and was DYING to own) was the MAC 217 brush! I have seen and heard such amazing things I just HAD to get my hands on it, and I did, TWICE as you can see. I got the first brush (for eyeshadow) In a MAC store in Dominican Republic and the second a couple of days later in New York City. I also got the Select Cover Up Concealer in D.R. (I had to upgrade my concealer before leaving to NYC)
The day before I left, I went into a MAC store, just wanting to buy something and picked a Mac Fix + , pictured below.

While already in NYC I went into a MAC store, and actually behaved very well for a makeup-holic. I picked another 217 brush, and two travel size items I had not packed (Blame me and my late packing). I picked an Oil Makeup Remover and Studio Moisture Cream, two items I really needed due to the cold and the... well, makeup.
xoxo
Ps. You're beautifulAn Unfinished Book is like an Unfinished Love Affair.~
26 de marzo de 2013
25 de marzo de 2013
Belleza Interior - Como sentirse Bonita! ♥~
Para la version en Ingles CLICK AQUI♥
Todas tenemos esos dias en los que nos sentimos Horribles, feas, gordas, etc. Nuestro pelo esta hecho un desastre! nuestra piel se ve horrible y nos creemos las mas ogras y feas del planeta entero!!!
Bueno, no mas!Todo es sobre la perspectiva desde la cual veas las cosas y hoy compartire un TIP que creo podra ayudarlas a muchas a sentirse mejor y ver lo bellas que son.
ENTONCES...COMO NOS SENTIMOS MAS BELLAS?
Lo primero que haremos para COMBATIR ese feooo sentimiento es MIRARNOS AL ESPEJO!
Si, nuestro enemigo numero uno en los dias en los que nos sentimos horrible sera nuestra arma para armarnos de auto-amor y belleza!
Nos paramos frente al espejo, y en vez de enfocarnos en todas esas cosas que hoy encontramos horribles nos enfocamos en nuestros aspectos bellos. TODO EL MUNDO LOS TIENE!Ya sean tus cejas, tus ojos, tu sonrisa, tus pomulos, tus labios, etcccc Enfocate en ello y admiralo, piensa en lo lindo que es y ya cuando te enfoques en el resto de la cara u otra parte del cuerpo te sentiras completamente diferente!! :D
Recuerda, la belleza esta en el ojo de quien la mira. Entonces dime, como te miras?
Inner Beauty - How to feel pretty ♥~
Para la version en Español CLICK AQUI♥
We've all had our days where we feel like we are the ugliest girls alive. Our hair is a mess, our skin looks horrible and we just can't wait until its bedtime just so we can be away from everyone and go to sleep in hopes of waking up looking better. Well, trust me darlings I have had those days, and it's not a pretty experience. Specially if your day is full of duties and Oh, Oh, going out with your boyfriend! :(

We've all had our days where we feel like we are the ugliest girls alive. Our hair is a mess, our skin looks horrible and we just can't wait until its bedtime just so we can be away from everyone and go to sleep in hopes of waking up looking better. Well, trust me darlings I have had those days, and it's not a pretty experience. Specially if your day is full of duties and Oh, Oh, going out with your boyfriend! :(
So how do we feel pretty WHEN WE FEEL LIKE CRAP??
EASY...
Whenever I feel like my self-esteem needs a BOOST I face my "ugliness". I do the following.
I step in front of a mirror and look at myself. No matter how ugly I feel, I know that we ALL have features that are gorgeous, so I find mine and focus on it. I look at it, I admire it. It may feel a little weird, but trust me it makes a difference. And afterwards when you admire how beautiful your cheeks, lips, eyes, eyebrows, eyelashes, etc is/are when you step back and look at your face in a whole you will have a totally different perspective.
We will all have bad days, we will ALL have days in which we feel like the ugliest girl alive. But if we focus on our good features instead of the bad, our whole perspective can change and so will our mood.
If you try this and it works for you pleaseee leave a comment below and tell me your experience, It would make me happy to know I was able to help someone ! :D ♥
PS. YOU'RE BEAUTIFUL♥
Beauty is in the eye of the beholder, so tell me, How do you see yourself?
21 de marzo de 2013
What's in my Bag? / Que hay en mi Bolso TAG
Hey gorg! So I saw this tag going around in YouTube a while ago and it thought it gave a little bit of insight in the person doing it. So I said to myself, Why Not? Here is My tag, and hope you somehow enjoy this. Cherry-lip-Kissessss.
Hola bella! Vi este TAG en YouTube desde hace un tiempo ya y pienso que ver videos asi te da mas o menos una idea de quien es la persona que estas viendo, por lo que pense, Por que No? Y aqui esta MI tag!! =) Espero que la disfruten de alguna manera. Besos de Cereza. Muah!
Makeup of the Day ! ( MOOD )
So last night I felt like doing makeup on someone else, and Oh, poor little sister of mine had to sit down and let me do her makeup. After all, that’s what little sisters are for, right ?
Some pics down below =) Enjoy
Asi que anoche me dio con querer maquillar a otra persona y Oh, mi pobre hermanita no tuvo mas remedio que sentarse y dejarse maquillar. Despues de todo para eso es que son las hermanas menores, no?
Aqui les dejo algunas fotos y espero que las disfruten =)
Aqui les dejo algunas fotos y espero que las disfruten =)


Ps. You are beautiful!~xoxo
19 de marzo de 2013
Spring Natural No makeup Look ♥
The NO MAKEUP makeup look is very popular this season. In this video tutorial I show you ladies how to create a Natural makeup look you can use all throughout spring, or even on a daily basis.
El look SIN MAQUILLAJE esta muy de moda en esta temporada. En este tutorial les enseño como conseguir un maquillaje Natural que pueden usar toda la primavera e incluso en el dia a dia.
tutorial de primavera, maquillaje natural, natural makeup look, natural spring look, natural everyday look, everyday look, natural look,
Beauty Blender Dupe! -Que es el beauty blender?
El beauty blender es una herramienta de aplicacion que se utiliza para aplicar maquillaje. Es fantastica! Funciona para practicamente todo, desde base hasta corrector, hasta blush, bronceador, simplemente TODO! Para utilizarlo primero debe mojarse para que la esponja crezca y pueda difuminar mejor el maquillaje y dar un acabado bello y natural.
How to get THE BEST OUT OF YOUR LASHES! ♥
You can avoid using false eyelashes and maybe having the embarassing
experience of them un-gluing while you are out with this quick and easy
tips on how to get the best out of your eyelashes! It's very quick and
easy, and all you will need is an eyelash brush, and a mascara.
(Optional, mascara base -white mascara).
Curl only the root of your lashes.
(Optional: Use eyelash "base" -white mascara)
The second step is to apply your mascara. Now, apply it while bringing the lashes out, to make sure that you are not only applying product, but getting them as long as you can as well. Apply as many layers as needed.
Brush them again. It will avoid having lumps in your lashes, and it will elongate them even more, since they now have the mascara and are thicker.
This tip will give you thick, long lashes :D
Thanks for reading; Hope you enjoyed!!! ♥
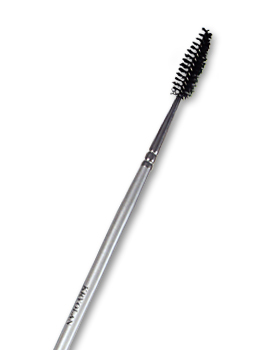 The first thing you're going to need is an eyelash brush, which look like this
Curl only the root of your lashes.
(Optional: Use eyelash "base" -white mascara)
The second step is to apply your mascara. Now, apply it while bringing the lashes out, to make sure that you are not only applying product, but getting them as long as you can as well. Apply as many layers as needed.
Brush them again. It will avoid having lumps in your lashes, and it will elongate them even more, since they now have the mascara and are thicker.
This tip will give you thick, long lashes :D
Thanks for reading; Hope you enjoyed!!! ♥
COMING SOON! ♥ COMPLETE ROMANTIC LOOK WITH ONLY 4 PRODUCTS!

Look COMPLETO romantico usando solo 4 Productos!!!
COMPLETE romantic look using only 4 products!!! ♥
Stay tuned,
-xoxo
11 de marzo de 2013
Cadenas para el pelo / Chain Halo

I am a mixture of things (personalities) and hence have a mixture of styles, but what also predominates is my 'bohemian' vibe. I LOVE Chain Halos because they look very very very bohemian, and give any outfit a "different" feel to it. You can also DIY them. THEY ARE SO EASY (& fun) TO MAKE! (I already made my first one)
~
Soy una mezcla de personalidades y por ende tengo una mezcla de stilos, pero lo que siempre predomina es mi vibra 'bohemia'. AMO los halos de cadenas por que se ven muy muy muy bohemios y le dan a cualquier vestuario esa pizca de "diferente". Tambien es un accesorio que puedes hacer tu mismo (DIY). SON FACIL DE HACER Y MUY DIVERTIDOS. (Ya yo hice mi primer par).

- Simple chain Halo


Natural/Romantic Makeup Look using Only 4 Products!!!
Achieving the “Natural Look” can be quite a hassle. Covering everything without looking like you have pounds of makeup on… yeah, It can be quite a challenge. I will share my everyday makeup routine, natural go-to with you ladies. Amazinglyyyyy, It is done using only FOUR products!! Full coverage, natural Romantic Look, light and easy to carry around and relatively inexpensive!♥
Conseguir el “look natural” puede ser toda una mision. Cubrir todo sin aparentar que tenes libras de maquillaje encima… Si, puede ser todo un reto. Compartire mi rutina diaria de maquillaje, la rutina a la que voy sin pensarlo dos veces para un look natural. Sorprendentemente solo se usan CUATRO productos!! Cobertura total, un look romantico natural, liviano y facil de cargar y relativamente barato!♥
PROCESO Y PRODUCTOS USADOS

- ELF all-over cover stick
- MAC Studio Fix Shade (NC42)
- ELF Contouring Blush & Bronzing Powder
- Maybelline ‘The Falsies’ Mascara
*

1) I applied ELF all-over cover stick first (in shade Spice), not worrying about it being too light (yet not over-doing it). I applied this under my eyes and all over my face where I needed concealer.
1.Aplique el corrector de ELF debajo de mis ojos, sin preocuparme por si quedaba muy claro (Pero sin exagerar). Aplique esto debajo de mis ojos y sobre mi rostro, en todo lo que necesitaba corrector.
2) I applied MAC studio Fix (shade NC42) with the sponge it brings, all over my face (Except my under eye area) with the same sponge that came with it in a tapping motion to make sure I got the full coverage it can offer. This can also be applied with a sponge or have several layers applied with a brush. If you do not need full coverage (GOD BLESS YOU) you can use a simple powder that shows your perfect skin. I then EVER SO SLIGHTLY tapped some into my under eye area (optional).
2. Aplique MAC STUDIO FIX (en tono NC42) sobre toda mi cara con la esponja que trajo (menos en las areas debajo de los ojos) y me lo aplique en topaditas y no arrastrando la esponja sobre mi cara para poder conseguir la cobertura maxima que este producto ofrece. Este paso tambien puede hacerse con una esponja normal o con una brocha, aplicando varias capas hasta lograr el efecto deseado. Si no necesitas una cobertura maxima (DIOS TE BENDIGA) puedes utilizar un simple polvo que ensene tu perfecta piel. Luego, LO MAS LIGERAMENTE POSIBLE con la misma tecnica aplique un poco sobre el area debajo de los ojos (opcional).

3) I then gave this some very good use. I LOVEEEEEE this, I completely recommend it. It’s like US$3.00 and I use it almost every single day. To contour I used the bronzer first and then used a mixture of the blush and the bronzer to blend everything together. Then I took the blush and applied some on my cheeks, and pressed the brush together in my hands to make it thinner and used it to contour my nose. I used the brush you see in the picture (It was the ONLY brush used in this process) to apply it and also used it to apply bronzer to my crease. To give my eyes some color I used the pink blush and applied it on my lids with my middle finger, making sure to apply it from the middle of my eyes inwards since the bronzer was beautifully blended in by the brush and since the brush was so big it gave my eyes a brown shade.
3. Luego le di a esta paleta bien uso. AMOOOOOOOOOO eso, y completamente lo recomiendo. Son como $3 dolares. Yo lo uso casi todos los dias. Para el contorno de mi cara utilice el color marrón primero, luego una mezcla de ambos colores para que los colores se matizaran y se viera mas natural y luego solo el rosadito en las manzanas de mis mejillas. Para todo esto utilice la brocha que pueden ver en la foto (es la UNICA brocha que utilizo en este proceso.) Tome la brocha entre mis dedos y la apreté para que fuera mas fina y la utilice tambien en el contorno de mi nariz. Con la misma brocha, utilice el bronzer para darle profundidad a mi mirada y lo aplique en el pliegue del ojo, difuminandolo bien. Luego con un dedo me aplique el color rosadito en los ojos para darle color y luminosidad, teniendo cuidado de aplicarlo desde el centro de hacia adentro, ya que al mi brocha ser relativamente grande al aplicar el bronzer le daba un tono marron a mi parpado movil por igual.

4) I used this version of THE FALSIES Maybelline Mascara. I applied one coat (because my eyelashes are long and with this mascara one coat is enough) and voila, the look was done. *
4. Use esta version de THE FALSIES Mascara de Maybelline. Me aplique una sola capa por que mis pestanas son largas y con este rimel una capa es suficiente. y Voila, el look esta completado*
*I don’t wear lipstick/lipgloss on a regular basis, hence me not using any on this tutorial.
*No utilizo labial ni gloss en un dia a dia, por lo tanto no lo aplique en este tutorial.
Thanks for reading ♣ Gracias por leer
Hope you enjoyed
REMEMBER, IT’S ONLY MAKEUP!~
10 de marzo de 2013
Maquillaje para miel Morena!~

Mi camara por fin funciona y puedo empezar a subir posts decentes. No puedo negar que amo tomar a mi hermanita menor y usarla como una muneca para hacerle el maquillaje y el pelo. En este caso, le hice un maquillaje con tonos medio anarajados que complementaron su piel magnificamente y la dejaron luciendo espectacular. Aqui les digo como.
Maquillaje para los ojos
- Antes que nada, aplique una pre-base en los ojos para que el maquillaje durara mas y los colores de este se vieran aun mejores.
- Luego utilize una sombra marron claro/mediano para usarla en el pliegue (la cuenca) del ojo. Dandole profundidad a la mirada. Hice esto como el primer paso para asegurar que el marron predominara o tuviera el mismo valor que el color claro.
- Tome un color anaranjado y lo utilice en el parpado movil, tomando en cuenta que queria alargar la mirada, por lo que lo aplique un poco afuera del ojo en una linea recta debajo del marron.
- Volvi al pliegue del ojo y esta vez utilice un marron oscuro, para poder definir la mirada y darle aun mas profundidad a la mirada.
- Aplique la misma sombra marron debajo del ojo y la uni a la sombra que venia del pliegue del ojo
- Aplique delineador liquido en negro e hice un pequeno “cat eye”
- Aplique dos capas de mascara Maybelline ‘The Falsies’
Espero que les haya gustado y gracias por leer! ♥
Recuerda, solo tu tienes poder sobre tu vida!~
Makeup for Dark Skin (Tutorial)
Makeup for Dark Skin “Tutorial”

~

Eye Makeup
- I started applied a light/medium brown on the crease of the eye, to give depth before I moved into the light color. I applied it in a windshield motion until a little bit outside the exterior corner of the eye. (The whole look was created with the Coastal Scents 88 Matte Palette)
- Afterwards, I took a slightly orange color and applied on the lid, making sure to also take it a little bit outside eye, to make the look more “cat eye-ish” and make the colors stand out more.
- I went back to the crease (this time with a darker brown) and applied it on the crease, making sure to blend the colors and make sure the color showed only in the outer corners of the crease.
- I applied the same dark brown in the bottom lid, and later connected that brown to the brown that came from the crease
- I cleaned up the eye to make sure it did not look like a mess on the outside corners of the eye
- I applied black liquid eyeliner, winged.
- I applied two coats of Maybelline The Falsies Mascara.
~
I completely love this look on her. I
think it complements her skin wonderfully and can be worn with both a
casual outfit as with a simplistic elegant one as well.
I hope you enjoyed and Thanksfor reading!
It is no one but us who has power over our lives!”
22 de febrero de 2013
Winged Eye Liner ~ Delineado tipo Cat Eye
So the winged eyeliner has mostly every girl in the world looking chic and fabulous without much effort nowadays. It's a simple way to get a very chic look and to take your makeup (and whole look) to the next level. Here, my ladies, I will tell you how to complement this winged eyeliner to make the eye stand out even more than it would with just a regular eyeliner.
To compliment the winged eyeliner one must ALWAYS CONTOUR THE CREASE OF THE EYE, Even if it is done with the lightest shade of a brownish color, that will make the crease look deeper and will make the eyeliner pop out. Your whole eye will change simply because of this little detail. In this particular photograph I took a light color and applied it in the internal part of my eyelid, and then took a brown shadow and applied in on the external part, shading the external part of my crease as well. Last, but not least, I applied eyeliner.
~♥~
El delineador en estos momentos tiene a toda chica en el mundo viendose chic y fabulosa sin mucho esfuerzo. Es un look bien simple, pero que hace una gran diferencia. Aqui, mis preciosuras, les enseñare como complementar el delineador para que sus ojos se vean aun mas bonitos.
Lo primero es que SIEMPRE DE DEBE sombrear el contorno del ojo aunque sea con una sombra super clarita en marron. Esto hara muchisima diferencia en el ojo, ya que el ojo se vera mucho mas bonito y resaltara mucho mas el delineado. En esta foto en particular yo tome un color claro y lo aplique en la parte interna del parpado, aplicando en la parte externa un marron oscuro y difuminandolo hasta el pliege del ojo. Luego, aplique el delineador.
Thanks for reading♥
21 de febrero de 2013

Cinturones de Metal!


- topshop Este es una excelente opcion si eres fan de los studs. ( US$50)
- ASOS Este es mi segundo favorito de todos los que encontre. (US $26.31 con envio gratis) Este sitio tienen muchas opciones BELLAS, asi que definitivamente vale la pena chequearlo.
Okay, los dos que siguen con casimente identicos,
con la unica diferencia siendo un detalle
(hay veces que pequenos detalles marcan la diferencia)
- Ebay Esta opcion me gusta mucho por que creo que la parte trasera hace que se vea elegante, o tan elegante como se podria ver un cinturon a este precio. Me encanta. La parte trasera es todo negro( US $20.65.)
- El segundo Y MI FAVORITO es de ministryofretail.com. (US $20.80) como pueden ver se parece mucho al de arriba, con la diferencia siendo que este tiene el detalle atras en laminas de metal, algo que a mi opinion lo hace ver aun mas trendy y mas elegante, ya que con un vestido la parte trasera tambien tendra un laminado de metal, dandole un al outfit algo extra.Espero haberlas ayudado y que les hayan gustado mis opciones. Un besote grande y gracias por leerme ! :D ~
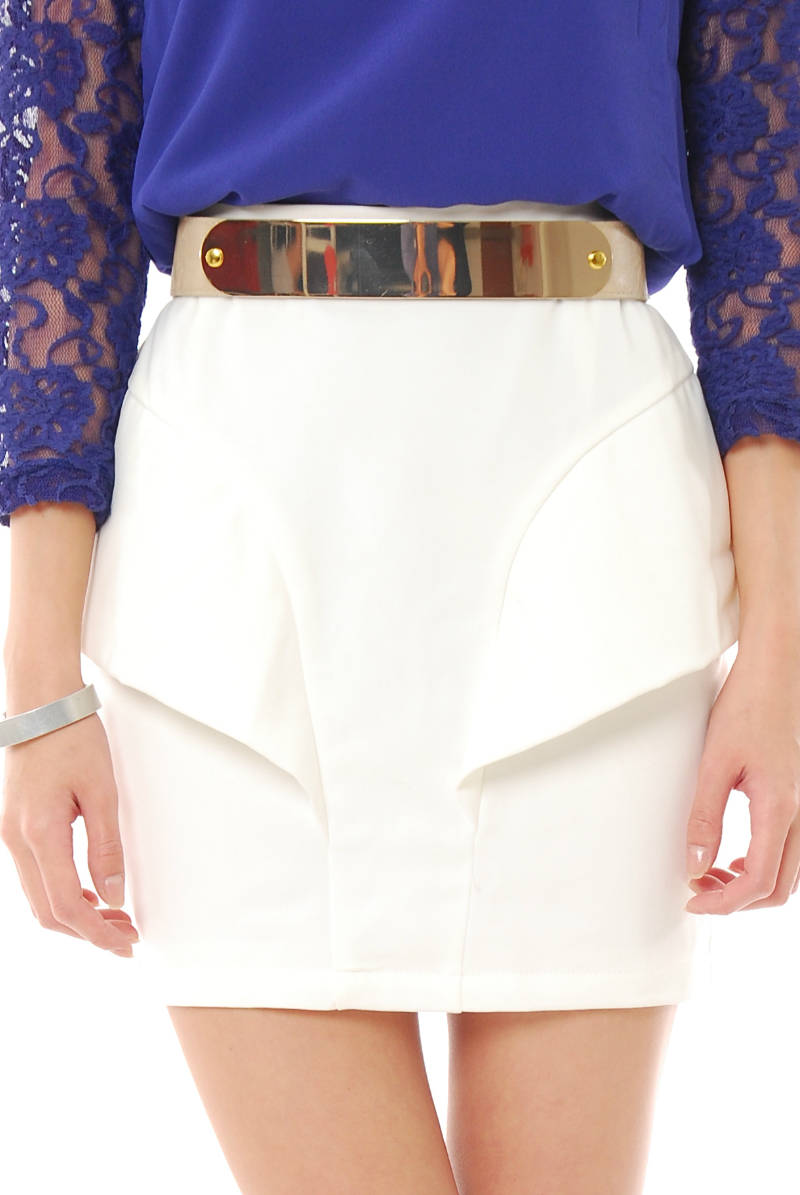
AFFORDABLE Metal Plate Belt! :D Where to get yours!

In case you've missed the latest red carpet events or fashion shows, I have a scoop for you : Plated metal is -and will be- the next 'It trend'. The gold metal plated accesories are everywhere right now, from handbags to belts, to caps, to trench coats. You name it, and somewhere someone is plating it. This little baby is so ultra CHIC, it simply transforms any outfit and turns it up a notch. I can see this being wore with elegant dresses, casual dresses, spring dresses, blazers, skirts high-low skirts...
Putting together an outfit for it, piece of cake. Finding one that is affordable, though, might not be so easy. I spent yesterday afternoon looking it up online, and If you -like me- are in the search for the cutest, most affordable gold metal plate belt, this is your lucky day, gorgeous... Links below.
- This topshop belt is a good option if you like studs. It's US$50 (Not sure how affordable this might be to American girls)
- This ASOS double plated and Spike details belt is My second favorite. It's $26.31 with free shipping. ASOS has several belts, so it's a site definitively worth checking out. I lovedddd this one, but I am not a fan of the spikes, so it won't be my first choice, but I def see myself getting this one pretty soon. So lovely!
Ok, so the next two are pretty much the same
(even regarding price), with a SLIGHT difference (that could be significant)
- The first, the Ebay option is very cute and elegant-looking in my opinion, and it has a black leather strap which goes with pretty much anything and makes any outfit look elegant. It's Approx. US $20.65. The back part has an all-black strap.
- The second one, AND MY ULTIMATE FAVORITE is from ministryofretail.com. It's $20.80. As you can see, if you inspect every detail like me, the back part has Metal detailing, which I think makes not only the belt look more expensive-ish and elegant, but makes it very very very chic. Specially if you wear it with a semi-bare back. It's also adjustable. This is my ultimate favorite because it's simple, it's adorable, and I can see myself rocking it with an all-black outfit
Burberry Prorsum AW 2013

The Burberry Prorsum London Fashion Week show made me fall in love all over again. It also made me very excited to see how this year's fashion trends will unfold.
I fell in love with it as soon as it started, and may I say that everything from the minimalistic runway to the details in every piece of clothing made me fall no-money-left-in-the-bank in love!~
Some of the trends that caught my eye:
GOLD METAL PLATING: It is SO IN RIGHT NOW! and I am excited. I love the futuristic/chic air it gives any outfit. This is a trend that promises to stay for a while, and I -my ladies- hope its a long one. This trend is not only being used in the gold plated belts, but also in small details and accesories, coats, handbags, and shoes.
PRINTS, PRINTS, PRINTS A mixture of prints were fiercely walked down the runway. Jiraffe prints, heart prints, leopard prints, you name it, you mix it. Dressing has never been this easy.
Leather in the Trench Coats: Another trend I loved. I thought it was a very innovative way of implementing leather in other garments. The leather part was mostly in the shoulder area, as you can notice if you notice the model behind Cara in the collage below
Holding your handbag by the bottom was also a trend impossible to miss. This seems to be the NEW way to hold your handbag since Fashion-related people such as Victoria Beckham have also been spotted holding their handbags this way. (In case I'm not explaining myself very well, hold them between your arm and body, instead of having them hanging them from your arm)
This year promises to be exciting, fashion lovers!~

Jaw-Dropping Makeup ~ Maquillaje Roba-Miradas
Este es un hermoso look que complementara a cada chica que lo intente, dándole una intensidad a su mirada que captara miradas tanto de día como de noche, sin importar la ocasión.
Te atreves a ser el centro de atención?
~
This is a look that promises to complement each and every girl that dares try it, giving your eye an intensity that will capture every one's attention,
during the day as well during the night, regardless of the ocassion.
Do you dare be the center of attention?
~xo
Maquillaje Hecho por Mi!

Una amiga me pidió que le hiciera el favor de maquillar a su modelo, así que CLAAROOO que acepte. Los nervios no me faltaban el día que me lo pidió por que mi maquillaje seria juzgado, pero mas que nervios tenia pura emoción! Fue tan divertido! Este fue el look terminado, maquillaje y pelo por mi y el vestido diseñado por mi amiga.
Productos Utilizados:

- Pre-base de ELF
- L'Oreal True Match Base
- Base Mineral ELF
- Sombra Marrón de ELF, en el tono Chestnut
- Sombra negra de Coastal Scents.
- Corrector crema de ELF
- Bronceador de ELF
- Labial de Cyzone
- Lipgloss de Covergirl
Makeup Look Done by Me!
So... remember this???
I was asked to do someone's makeup and this is the look that we decided would complement the dress in the way that we wanted to do so. I was also the one to do her hair and style her in general. It was fun. :)
This was a makeup that was done with many drugstore products and was very easy to do. Steps and more info below
I started off by applying primer, and then I applied L'Oreal True Match Foundation with a beauty blender in both the face and neck. I lather moved on to the eyes, starting with a Mineral Eye Primer, and moving on to contouring the eyes and then started applying the black eyeshadow. The way I did was that I first lined the eyes in the shape I wanted them to be, and then filled it in after both eyes were good-to-go and matching. Afterwards, I took a blending brush and smoothed away the edges, everywhere, but specially in the end. I then took a little Chestnut colored Elf Matte Eyeshadow and applied in on her crease right where the black eyeshadow met the crease, to make the color blend it better with her skin tone.
Later, I applied some Elf Concealer under her eyes and all the way up to her temple. Tapping it in with warm fingers so that it blended it better with her skin. I also applied some concealer on the bridge of her nose, her forehead and her chin to give her face some light.
Afterwards I contoured her face, neck, and nose, with the bronzing powder from elf, and applied mineral blush in the shade Blush. For the lips, she was applied a rosey-pinkish shade of lipstick which was afterwards topped with a little bit of gloss on strategic points to make her lips look more plumped. Afterwards a red Cyzone lipstick was ever-so-slighty tapped into her lips for a more reddish effect.
HAIR
For the hair, we did a very stylish, yet always easy - to - do Sock Bun.
We tied her hair in a high pony tail, and afterwards took a cut sock and placed it in her pony tail. We then took her hair and circled it around the sock, giving it that stylish Perfect-Elegant-Stylish Bun effect.
Hope you thought it was cute :p
Thanks for reading!
~xo
Suscribirse a:
Entradas (Atom)